SCOLIOSIS
Please scroll to the bottom of the page to enable translation for the entire text. | |
Then click the printer symbol to print the instructions in your chosen language. | |
Please note this is an automatic translation, which means there may be some errors. |

Copyright © Alastair McLoughlin 2015 Revised © Alastair McLoughlin 2019 and 2022
The right of Alastair McLoughlin to be identified as the original Designer, Developer and Author of the Work has been asserted by him in accordance with the Copyright, Design and Patents Act 1998.
All rights reserved. No part of this text may be reproduced, stored in a retrieval system, or transmitted in any form or by any means without the prior written permission of the publisher, nor be otherwise circulated in any form of binding or cover, or reprinted in any physical or electronic manner without the written consent of the author.
The ideas and concepts explored within this text are those of the author. For educational purposes only.
No diagnosis is being offered nor any cure promised by the application of this information.
Alastair McLoughlin cannot be held responsible for any injury arising from the application of this work by the practitioner to any third party however caused.
This work is not a substitute for medical attention. Please seek your physician’s advice if in doubt.
Note: This work CAN be used for either lumbar or thoracic scoliosis. In this demonstration the thoracic area is treated.
If there is a lumbar AND thoracic scoliosis perform treatment first in the lumbar and then in the thoracic area IN THAT ORDER.
Address both lumbar AND thoracic areas in one session.
Correction of one area will need its corresponding deviation to be treated to achieve balance.
 INDICATIONS FOR USE
Idiopathic (functional) scoliosis raging from mild to moderate deviation
 CAUTIONS OR CONTRAINDICATIONS
 - Do not perform these moves if fracture of a vertebra or vertebrae have been diagnosed and confirmed or if there is any possibility of a fracture.
- Do not perform these moves where there is diagnosed osteoporosis.
- Be cautious in cases of osteopenia.
- Do not perform these moves if there is any disc injury or the possibility of any disc injury.
- Do not perform this work if surgical rods have been implanted to fix the spine in place.
- Refer for medical diagnosis if you are unsure about any undiagnosed medical condition.
 Position of the patient:
The patient should lay prone, with the client’s head resting in the breathing hole of the treatment table.
This keeps the upper thoracic area in correct alignment - the ideal position for this AoB procedure.
Do not perform this work with a client’s head side-laying!
Always use a breathing hole for this work!
 Assessment:
Identify any deviation of the spine using fingers and thumbs as shown in the video demonstration.
Deviations can be small - but significant - so check alignment carefully.
You can identify deviations of any lumbar or thoracic spinous processes using sticky ‘dots’ as shown.
When you do this any deviation becomes very obvious.
 Application of the AoB procedure:
IMPORTANT:
With this procedure it is absolutely vital to have the correct mental approach to the work.
We are not forcefully ‘pushing’ the vertebrae into position.
We are simply giving the “suggestion” to the body that the deviated vertebra would be “happier” in the aligned rather than the misaligned position.
In this way no great force is exerted.
It is vital that this work is done extremely slowly.
Some of these video clips appear to be ‘still photos’ when in actual fact it is a video sequence.
The work is performed so slowly it appears that nothing is happening, yet a very slow movement is being performed that is almost imperceptible to the viewer.
Also note that the thumb is used - with the finger of the opposite hand just ‘resting’ on the thumb to help steady and control the speed of the move.
| Place the thumb on the convex side of the deviation in the paraspinal space as shown and apply gentle force medially as shown. This sequence is S-L-O-W. Slower is better! Wait 5 minutes and re-assess. Apply gentle force to the vertebra that has most deviation - i.e. the vertebra at the furthest point from the midline (A). Then, after you have spent some time working on that vertebra, apply the same gentle force to one vertebra above (B) and below (C) that initial starting point - one vertebra at a time. Wait 5 minutes and re-assess. You may need to go back and repeat the patterns of A - then B and then C. | 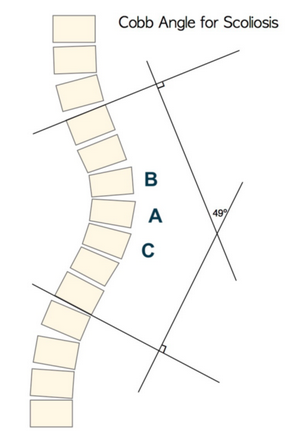 | |
 Reassessment:
Take off the sticky dots.
They will not appear to have moved because the skin stays in the same place - but the vertebra may have now repositioned.
To confirm this, palpate the spinous processes once again.
You may replace the sticky dots on top of the spinous processes.
If you have affected a good response you should see all the vertebra now in line.
 Help the client to a seated position:
Pause and check the client experiences no dizziness or light-headedness.


If they are dizzy or light headed then wait for a minute or two to allow that feeling to clear itself.
Only then may the client step down from the couch placing BOTH feet on the floor at the same time to allow even weight-bearing into both hips to occur as shown in sequence:
If the client continues to be dizzy after waiting two minutes then lay them in a foetal position, cover them with a blanket and wait for the dizziness to pass as shown in sequence:
Return them to a seated position and check any dizziness has subsided.
Ask them to stand - placing BOTH feet on the floor at the same time to allow even weight-bearing into both feet to occur.
The client may need to sit for a few moments before dressing and leaving your office.
 How it works:
We do not force anything into position.
We give the ‘hint’ of movement by applying the pressure as shown in the video presentation.
Slow movements without force can improve scoliosis and lateral deviation of the spine in one or two sessions - even after decades of misalignment.
In some cases, you may have to perform a few treatments to fully correct several vertebra.
Do not force the vertebrae to react.
They will change with minimum effort on your part.
If there is a lumbar AND thoracic scoliosis, perform treatment first in the lumbar and then in the thoracic area IN THAT ORDER.
Address both lumbar AND thoracic areas in one session, as correction of one area will need the corresponding deviation to be treated to achieve balance.
Some muscular aches can be experienced by the client for a few days after treatment.
This is normal and these symptoms will dissipate as the client gets used to the new position of their skeletal framework.